
*If you like DIY paint chip crafts, check out my coasters and my Christmas Calendar.

Supplies: paint chips, glue, white paper…I used a Crayola floor pad.


I chose the floor pad because the top is hooked together with a strip of gluey stuff, making it easy to tear off each calendar page as the month ended while still holding the rest of the calendar together. The pad had 30 pieces of paper on it which I didn’t need, so I tore the pad in half. I just bent it backwards and it ripped quite nicely.

I measured the squares on our old calendar, which was approximately the same size as the floor pad…

and cut the paint chips to the same size, 2.5” x 3.” I left the color names and numbers on because I have a thing for clever names like Lime Sorbet, Spring Cactus, and Dancing Leaf.

I then recruited daughter 3, Lainey, to do some gluing. She agreed only after I told her she could wear a badge. Really!

As instructed, she is such an obedient child, she first laid out the top row and left column and then glued them on so that their would be a marking point to keep the paint chips relatively straight. She used a good old Elmer’s glue stick.

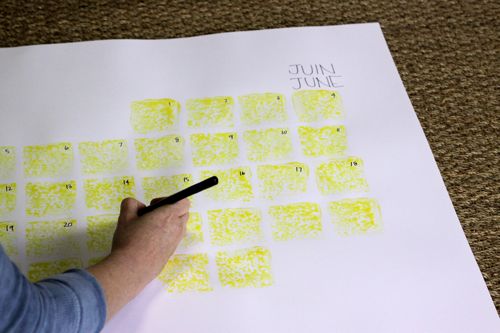
I also asked Lainey to make sure that no same colors were next to each other, so she laid out each row before she actually started gluing. I think she did a great job! Here is the calendar with all of the paint chips glued on.

We plan on doing different colors of paint chips for each month of the year.
Tips for a DIY Paint-Chip Calendar:
1. When getting paint chips, ask if there is a limit to how many you can take. Although the chips are free and there for the taking, I thought it was the polite to ask anyway. I got these paint chips at Wal-Mart because I happened to be there. I didn’t think they would want me to take over 300 (enough for the year), so I asked for 30, and they said yes. When cutting the chips, I realized that I could have cut 2 out of each paint chip, so I could have just asked for 15, or I could have taken 15 of another color for April’s calendar. Incidentally, I will be picking up paint chips for the next little while so that I have enough for the rest of the year.
2. A glue stick worked great for us, but you might like a heavier glue. The very corners are not quite flat, but they were good enough for what I wanted.
3. Make sure that you look at a calendar while laying out the squares. Although we put 32 squares on the calendar, it didn’t work out as to how the days and dates fall in the month. March 31 will have to be white.
4. Make sure you have a writing utensil that will work on the paint chips…nothing that will smear. I have a thin Sharpie, so that is what I am using to write on the calendar.
5. Whoever glues the paint chips on gets to wear a project girl, or boy, badge. This will ensure that they do their very best work.
Check out these other fun paint chip ideas:

Bookmarks by Jessica at How About Orange
(I love these colors and have thinking about them in my kitchen and dining room…
do you think blue cabinets are totally crazy?)


Love the calendar! I have so many paint chips in a box, what a great way to recycle them :)
ReplyDeleteWhat a great way to take an idea and put your own spin on it! I might have to make one of these for my girls' room once we finish redecorating. Thanks for the inspiration.
ReplyDeleteI absolutely LOVE this! The way the colors make it so graphic that they seem to pop off the calendar, amazing! I am now a follower!
ReplyDeleteHello from Casual Bloggers. Great use of paint chips and something that will last beyond 2011 -- you'll always have something to refer to that will also bring back memories! Excellent idea. Thank you so much for sharing. Come visit when you can...
ReplyDeleteHoly cutest idea ever! If I hadn't just bought a huge calendar, I would totally do this! A cute color theme for every month... so fun!
ReplyDeleteI LOVE THIS. Thank you for some much need inspiration!
ReplyDeleteSuch a great idea and turned out so cute! Totally gonna try that since we still haven't decided which colors the walls are going to be. There are at least 10 different paint chips in my living room! I'm happy that now I'll have some use for them :)
ReplyDeleteJust found this and absolutely love the project!
ReplyDeleteHi! I featured this project on Fun Friday Finds. I hope you will stop by and check it out.
ReplyDeletehttp://www.itsybitsypaperblog.com/2011/08/fun-friday-finds-paint-chips.html
Love this idea!! Came across your calendar on pinterest.
ReplyDeleteWhat a great idea! Love the "project girl". Can't wait until my boys are a little bigger and can do stuff like that!
ReplyDeleteHi! I came across this project via Pinterest and I'm so inspired! I LOVE paint chip projects and I'm a little crazed about calendars. I'm so glad I found your site...I'm following now and can't wait to check out other projects you have. Happy New Year! Liz (sunnybugworld.com)
ReplyDeleteA friend of mine made one of these but used a giant frame with plastic instead of glass, and it is a dry erase calendar.
ReplyDelete